The Ultimate DIY Floating Flower Wall Hack – Gorgeous Results in Hours!
This post is all about how to create a DIY Floating Flower Wall in a matter of hours, for an unforgettable addition to your party.
The first time I attempted a DIY floating flower wall, I was helping my friend decorate for her bridal shower. She wanted something elegant yet personal, a backdrop that would make her photos unforgettable. We looked into renting one, but the price tag? Way out of budget.
So, armed with a hot glue gun, a mix of fresh flowers and faux flowers, and a whole lot of determination, we set out to create something magical ourselves. And guess what? It turned out stunning! If you’re looking for a way to transform a space with a beautiful range of florals, this is the project for you.
Whether you’re decorating for a wedding, bridal shower, or birthday party, a DIY floating flower wall is the perfect decor choice. This guide will walk you through the decor essentials you need to craft an entire wall of beautiful blooms, effortlessly blending different types of flowers to suit your theme.
And the best part? It’s affordable, beginner-friendly, and can be customized in different ways to fit any event space. So let’s get DIY’ing girls!
How to Create a DIY Flower Wall in an Afternoon
This post may contain affiliate links, which means if you decide to make a purchase via my links, I may earn a small commission at no extra cost to you. However, I will only promote products I believe will be beneficial to my audience.
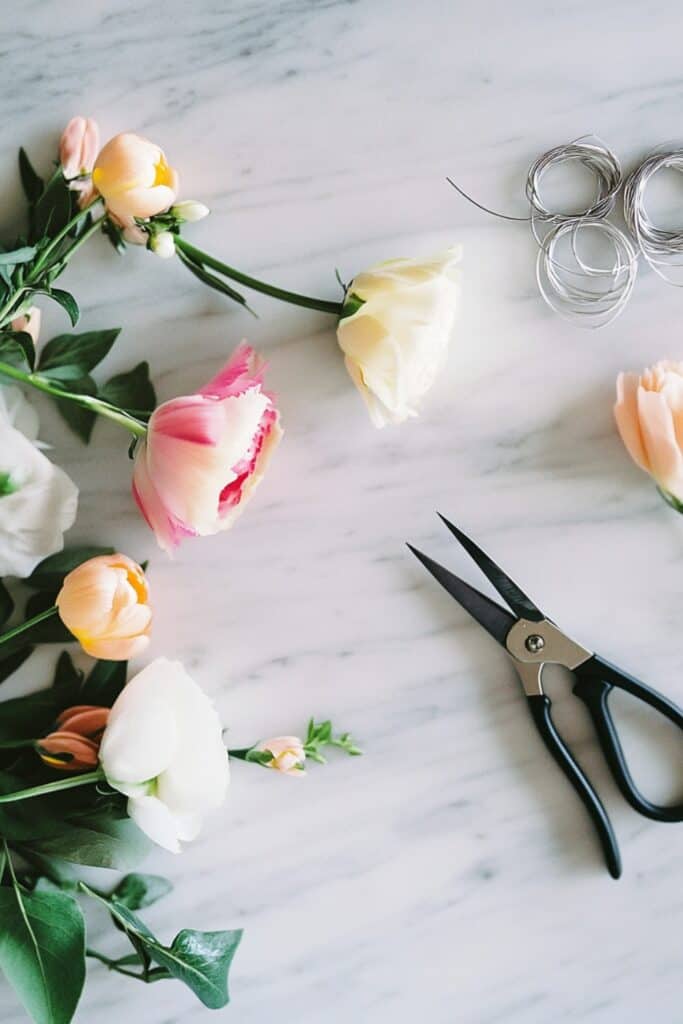
What You’ll Need:
Here’s everything you will need to create your flower wall. I’ve linked some of my favorite Amazon products to help you along the way.
- Fresh flowers and faux flowers (a mix works best!): Choosing both real flowers and faux flowers ensures that your wall looks full and rich. Fresh flowers bring fragrance and a natural touch, while faux flowers are great for structure and longevity. I get all my faux flowers from Temu, the quality is unreal and they look so realistic!
- Wire cutters: Essential for trimming the stems of your flowers to the right length.
- Clear fishing Wire: This will hold your flowers together and allow them to hang or attach securely.
- Hot glue gun & glue sticks: Perfect for adding extra security to your arrangement and securing flowers where needed.
- Ceiling hooks, glue dots, nails, or gaffer tape for hanging: Depending on the space, you’ll need hooks, nails, or strong tape (piece of tape) to hang the flowers securely.
- Backdrop Frame: If you don’t want to hang your florals from the ceiling, this is an easy transportable solution.
Pro Tip: The type of flower doesn’t matter, but flowers with larger petals tend to work best, like: roses, peonies, ranunculus etc
Recommended: How to create a Beautiful DIY Flower Bar on a Budget
Step-by-Step: How to Make a DIY Flower Wall
Step 1 : Plan Your Floral Layout
The key to a great DIY flower wall is the design. Lay out your floral collection on the floor or a large table to see how the flowers work together. Mixing different flowers like large flowers, small flowers, roses, peonies, and daisies creates a more natural, layered look. Also remember to look at the space you want to fill. If you’re hanging it on a wall, how tall and wide is it?
Good idea: Choose a color palette that matches your event theme. Soft pastels for romance, bold hues for a vibrant celebration, or neutrals for elegance. You can also use a mix of single flowers to create texture, ensuring your flower wall has depth.
Step 2: Prep Your Flowers
Now that you have your flowers selected, it’s time to get them ready. Use wire cutters to trim off the stems of your flowers to various lengths, leaving 2-3 inch stems, and trimming any fussy leaves. This gives your flower wall depth and dimension, so you won’t have flowers all lined up at the same height.
If you’re working with fresh flowers, make sure to keep them hydrated until the last minute to keep them looking fresh and vibrant. You might also want to trim the stems at an angle just before setting them up.
For faux flowers, you can fluff them out by gently pulling apart the petals to make them look fuller. Consider using silk flowers for a more realistic look.
Pro Tip: If you want to create a natural effect, mix in some floral petal garlands or artificial greenery like ferns, ivy, or eucalyptus. These additions will make the wall feel lush and abundant.
Shop my favourite Faux Flowers from Temu. I love them so much I used them at my own wedding!
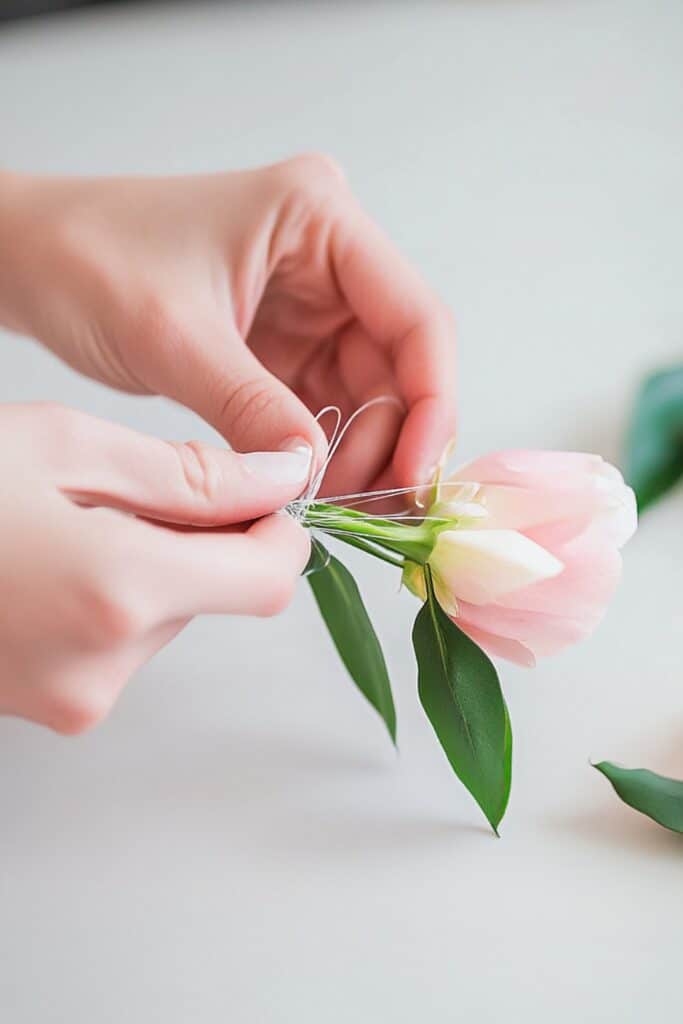
Step 3: Assemble Your Flower Strings
Once your flowers are prepped, it’s time to start assembling the strings of flowers. You can use fishing wire or a glue gun to attach each flower.
Grab your first piece of fishing wire and leave about 6-8 inches at the top—this will give you room to tie it to your backdrop frame or ceiling later. Start tying your flowers to the wire one by one, and every now and then, mix it up by adding in some leaves or layering a couple of blooms together.
Play around with different textures, colors, and sizes, making sure that no two flowers are too close to each other. Keep about 6-8 inches of space between each bloom for a nice, balanced look.
Pro Tip: You can also add some height to your flower wall by layering flowers on top of each other. For example, a larger bloom can sit beneath smaller ones to give a fuller, multi-dimensional look.
Step 4: Rinse and Repeat
Repeat the step above with the remaining strands of fishing wire you desire.
Recommended: 20 Stunning Wildflower Bridal Shower Décor Ideas on a Budget
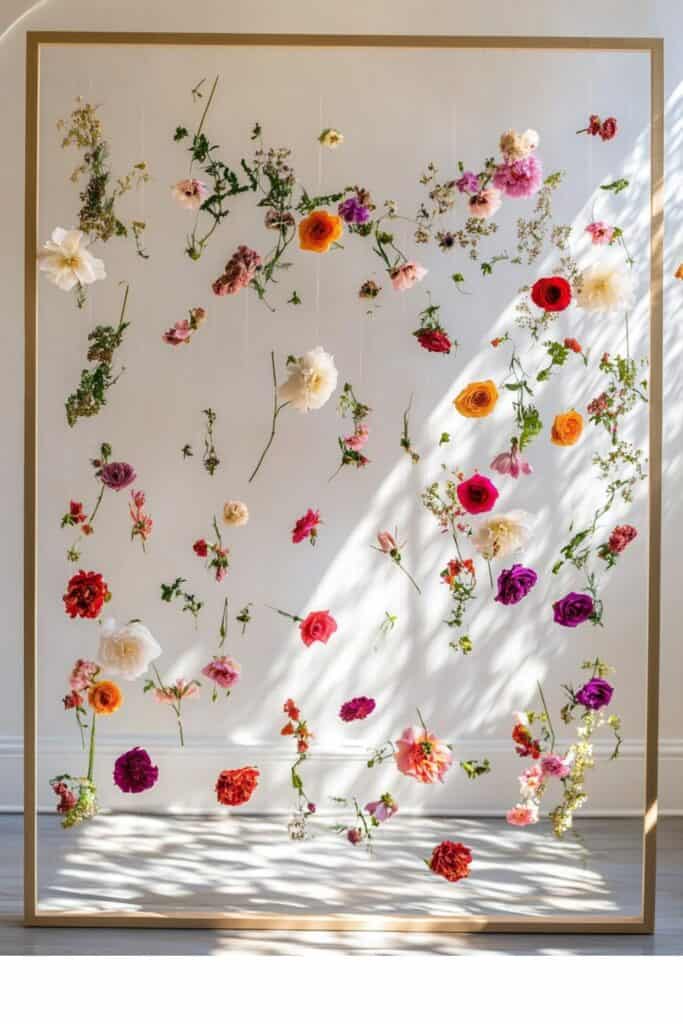
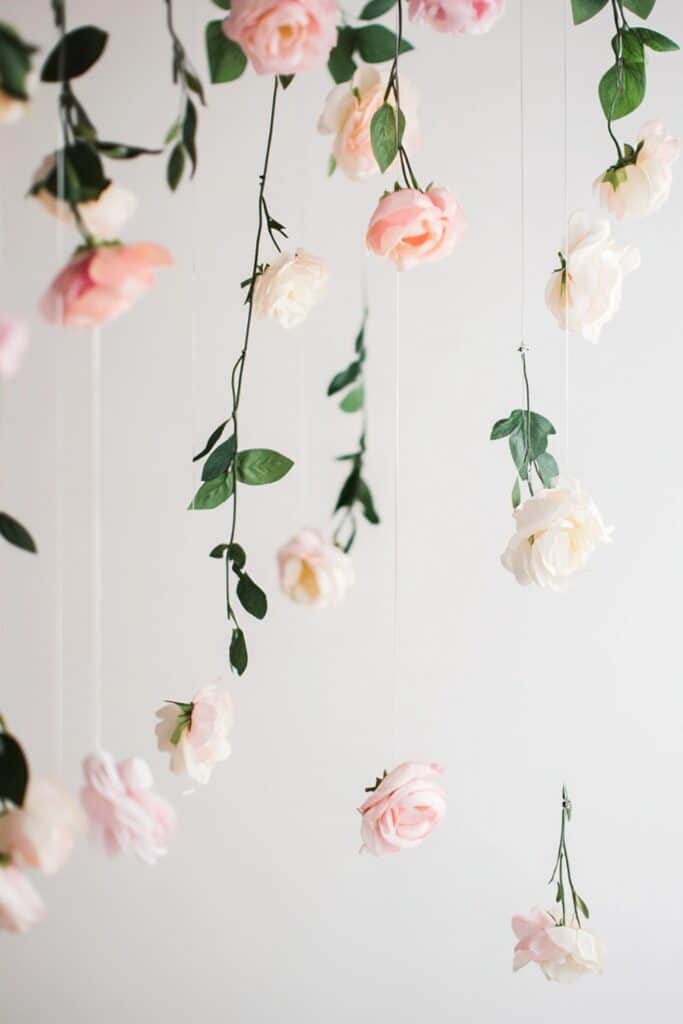
Step 5: Hang Your Floating Flower Wall
To give your flower wall that magical floating effect, try hanging the flowers from the ceiling using glue dots. If you don’t want to glue it to your ceiling here are some other hanging options for you:
Hanging options:
- Use ceiling hooks to attach each flower strand, allowing them to hang freely for a whimsical effect.
- Secure strands directly to a wall using strong gaffer tape for a clean, minimal look.
- If you prefer to create a curtain-like appearance, hang flower strands from an Amazon backdrop frame.
- If you’re aiming to cover an entire wall, be sure to space the flowers evenly across the surface. This will ensure that your flower wall looks full and lush, and no gaps are left behind.
Pro Tip: Have a friend step back and check the alignment before securing everything permanently. A fresh pair of eyes can help make sure the flowers look balanced and even from a distance.
Why You’ll Love This DIY Flower Wall
✔ Perfect decor – Whether it’s for weddings, baby showers, or intimate gatherings, a DIY flower wall adds an elegant and stunning touch to any event. It’s the easiest way to transform your venue into an unforgettable event.
✔ Customizable – You can adapt the flowers to fit any theme or aesthetic—whether you prefer bold colors, soft pastels, or neutral tones, the possibilities are endless. Plus, it offers a beautiful range of styles that can suit any vision.
✔ Affordable – Compared to renting a flower wall, this DIY version is a fraction of the cost and allows you to create a stunning backdrop for your event without breaking the bank. It’s an affordable touch of elegance that will wow your guests.
✔ Unforgettable photos – A flower wall is a perfect photo backdrop that will have your guests snapping photos all night long. Trust us, the photos will be cherished forever. Imagine a photo in front of this show-stopping table decor or the beautiful lighting collection created by LED lights or fairy lights. Plus it’s perfect for DIY photo booths!
✔ Easy to scale – Whether you want a small flowers corner or a massive full-size wall, this DIY project can be adapted to fit any space, from intimate home displays to large events. It’s the easiest way to achieve a large easy flower wall in no time.
Recommended: 21 Insanely Cute Spring Crafts for Girls Night – under $20
Ready to Create Your Own Flower Wall?
This DIY flower wall is the perfect project to transform any special event into something extraordinary. With just a few supplies, some creativity, and a little elbow grease, you’ll have a breathtaking floral backdrop that will leave everyone in awe.
So, grab your hot glue gun, your staple gun, and your flowers, and start crafting! Be sure to incorporate some decorative accents to elevate your design and make it truly unique. Don’t forget to share your final look with us—we’d love to see how your creativity comes to life.
For a complete look, be sure to add fairy lights or LED lights for that extra wow factor and create a breathtaking decor that will dazzle your guests.
This post was all about how to create a DIY Floating Flower Wall
For more TikTok-worthy DIYs, check out our blog posts below!
- How to create a Beautiful DIY Flower Bar on a Budget
- 20 Stunning Wildflower Bridal Shower Décor Ideas on a Budget
- 21 Insanely Cute Spring Crafts for Girls Night – under $20